Saturday 31 December 2011

Time for goodbyes, and welcome to 2012!

I hate goodbyes, (au revoir is so much nicer) so, as 2011 draws to a close, The Artistic Stamper Creative Team is saying au revoir to Hels.
 I first encountered Hels about 4 years ago when I joined a forum, and came across her work on her blog. This inspired me to start my own blog ( who'd have thought that blogging would become so big !) , and I in turn asked her to create some artwork for us here at The Artistic Stamper. The rest they say is history!
 Hels has been my Creative Co-ordinator for the past 4 years, and I will miss her , not only for her creative artwork, inspiration and ideas, but for her "behind the scenes" help, whenever I have needed it. She has organised all the Creativity that you see on the blog ,  even designing her own stamps..namely Stitchels, as well as creating her own artwork for her blog.  Thank you for the past four years, it has been fun. We wish you all the best for the future.


 We also said au revoir to Nicky ( aka Minxy) who has always made me smile with her innovative artwork. Nicky has been with The Artistic Stamper for about 3 years , and will be missed for her gorgeous innovative artwork, and her inspiration using our stamps.


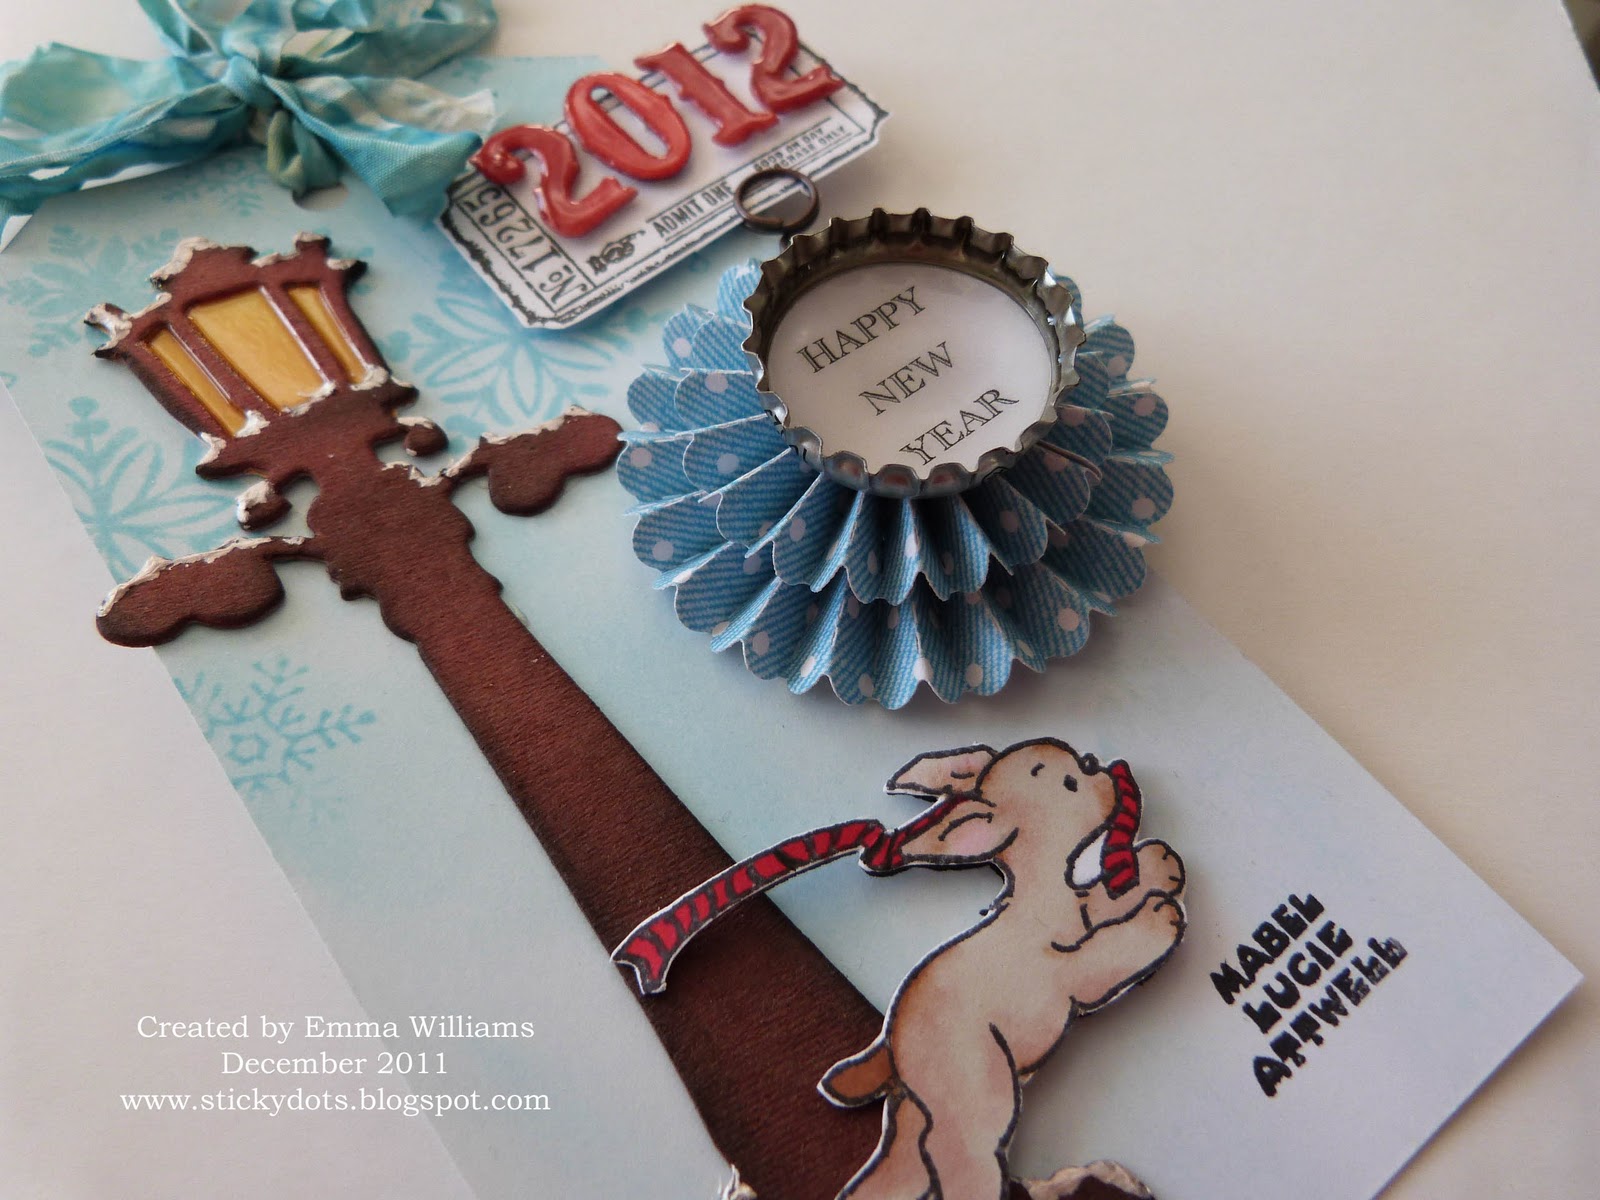
Finally Tina has decided to leave the team, and her artwork using Mabel Lucie Attwell has never failed to inspire!

We wish you the best for the coming year, may 2012 be bright, and fun filled, and full of Creativity!

Happy New Year! See you in 2012!
Jennie

Thursday 29 December 2011

Happy New Year by Emma

Hi everyone!

Hope you all had a lovely Christmas and you're now looking forward to celebrating New Year's Eve and the start of 2012!! 

Once again, time has flown by and I can't believe that it's already my turn to show you my final piece of this month, featuring the FREE stamps that you get with every order that you place at The Artistic Stamper right up until the end of December.

I've included lots of close up photos of my tag, to show every little detail and I really hope you like it.
To begin with I stamped the Mabel Lucie Attwell "Scamp" onto a piece of white card, coloured it with alcohol pens and cut this image out. I then blended Tumbled Glass and Antique Linen Distress Ink over my tag, inked up the FREE snowflakes stamp with Tumbled Glass and stamped the snowflakes onto the top section of my tag.

Next, I die cut the Tim Holtz's Bigz Holiday Lampost from Grungeboard and blended Gathered Twigs, Aged Mahogany and Black Soot over the die cut piece. I then used Wild Honey DI to create the light effect and covered it with Glossy Accents. I stuck this to my tag and added some "snow" onto the lampost using the Snow Cap Acrylic Paint Dabber. I then stuck my little coloured image of "Scamp" onto the tag, at the bottom of the lampost.
I used the Tim Holtz Mini Rosettes die and some paper from my stash to make my rosette stack. Typed out a Happy New Year message and used a circle punch to punch it out. Next, I added the message to a bottle top and covered it with Glossy Accents before attaching it to the top of my stack.
I inked up the ticket stamp from the Tim Holtz ~ Odds and Ends stamp set with black Archival ink, stamped it onto white card and then die cut the "2012", using Tim's Decorative Strip Vintage Market die. I blended Fired Brick Distress Ink over the numbers and added Glossy Accents to the top. I then stuck the numbers onto my ticket using 3D foam and attached it to my tag with an Idea-ology Memo Pin.
As the finishing touch, I added some seam binding which I tie dyed using some Tumbled Glass Distress Stain.
So, that's about it for this post, and for this year!!

I hope you all have a wonderful, healthy 2012 and I wish you all a very Happy New Year. Thank you so much for stopping by to leave your lovely comments on all the pieces I've made since joining the team ~ I really appreciate it!
See you in 2012...
Emma x

Wednesday 28 December 2011

Guest artist for December, part 3, my final offering

Well hey there,
I am so excited and sad at the same time to be back with my third and final offering for my guest artist spot for December.!!
I want to say a huge thanks to Jennie and Hels for this fantastic opportunity, wish I could do it again!I have loved making these projects, so thanks!
So for my third offering offering I have used some fab insects and butterflies stamps, a configurations box and lots and lots of Artistic Stamper goodies!
So here it is:
I have always wanted to do a configurations box and now seemed like a fab time to make a butterfly and bug box trace style.
I started by cutting papers from the lost and found stack of Tim Holtz papers to size, using plain pieces for the sides and base and more patterned papers for the backs.I then over stamped these papers with the fab bugs and butterflies from the insects and butterflies plate, using black soot distress ink and the smudge background stamp in pumice stone.
Once the papers had dried I glued them into place and covered the joins using sketchbook tissue tape, I love this stuff!
Now for the fun bit, filling the box:
I wanted to showcase the stamps as much as possible and loved the way I could use these detailed images on clearly for art film, shrink plastic, dominoes and grungepaper.
There is too much to detail it all so here are a few of my favourite bits:
I used some blank dominoes, coloured with alcohol inks and edged with metal tape, these then had images stamped on using archival ink.I layered two together to get greater depth. The other set of dominoes I added an ideaology key and a shrink plastic butterfly.
I loved making wings for the fractured doll, using clearly for art film, coloured with alcohol inks and some beadazzles added for a touch of bling.

The frame for the box had ideaology corners added and some fab leaves from Wendy Vecchis arts parts added, which were pained with crackle paint, in peeled paint..the butterflies were made as above.
My final favourite, although it was hard to choose, as I loved filling each and every section and want to do another !!!,was the pocket watch section.
I added a grungepaper circle, coloured in Distress inks and stamped with butterfly
from the insects and butterflies plate.Then I added some shrink plastic butterflies and some beadazzles. The pocket watch shape next to it was made using a chipboard piece, colouring with distress inks, stamping butterfly and finally adding crackle glaze.

Well hope you like my last and final offering!
Thanks again for this fab opportunity!
Hope to see you around in blogland
hugs trace x

Sunday 25 December 2011

Merry Christmas!

To all our readers, we wish you a very Merry Christmas from all of us at The Artistic Stamper Creative Team.
May your holidays be joyful and merry and very inky!
Hugs from
Jennie, Hels, Sioux, Alison, Kat and Emma xxx

Saturday 24 December 2011

Kisses From Heaven by Alison

Merry Christmas Stampers! It's Christmas Eve, & here's my final post of 2011! I have altered a wooden heart, & made an icy Winter decoration. I have used the fab snowflake stamp, that you can get free with any order this month.


I began by priming the wooden heart with Studio Gesso, then painted it with Blank Canvas Studio paint. When it was all dry, I coated the heart with Rock Candy Crackle Paint. I left it to dry naturally, then dabbed Stormy Sky Distress Stains all over, to highlight the cracks. I stamped the Snowflakes with Black Stazon, then inked the edges of the heart with Walnut Stain Distress Ink.

I inked an Artistic Stamper Chipboard Flower with Versamark ink, then triple embossed it with Pearl UTEE. When the final layer was still molten, I stamped into it with a script stamp. I trimmed the excess UTEE, then inked the edges with Walnut Stain Distress Ink.


I used the Sizzix Tattered Florals die to cut some flowers out of tulle fabric, then layered these with the chipboard flower & a decorative brad. I glued the flower to the heart with Glossy Accents.

I used alphabet stamps from the Scrabble & Tags Plate, to stamp the phrase, cut them out, inked them with Walnut Stain DI, then glued them to the heart with Glossy Accents.

Finally, I punched 2 holes in the top of the heart, using a Cropadile, added silver eyelets, silver wire to hang, & a couple of pearl beads. I twirled the wire ends around a paintbrush to hold the beads in place.

Thanks for looking, & I hope you all have a wonderful Christmas & New Year!
Alison xxx

Friday 23 December 2011

Merry Christmas by Hels

Goodly Morning Stampfans! Today I am here showing you a quick Christmas card I have made Linkusing one of my favourite Artistic Stamper stamps... this old Santa looks like a jolly old chap and I love how detailed the stamp is. He is from Christmas Plate #3.


I wanted to make a statement with the stamp as the focal image of the card so... here's how I did it;
I stamped Santa in Jet Black Archival ink onto cream cardstock and gave it a quick zap with a heat tool to set the ink. I used Vintage Photo Distress Ink and a Blending Tool to make a vintagey edge to the card and then used Fired Brick and Peeled Paint Distress Ink, along with my water brush, to paint in the colours over the image. I then popped a teensy dollop of SnowCap Dabber onto my craft sheet and watered it down and then painted in his beard and hair... because the paint is thinner, you can still see your stamped image but the white really makes his beard and hair pop.

Link

I used a thin paintbrush to pick up some Gold Dabber and painted around the circle and gave this a zap with the heat tool to dry it. Next, I used a thin paint brush to pick up some Rock Candy Cracklepaint and I painted carefully right over the top of the Gold circle. Once this had dried, I used Distress Embossing Ink and coated the whole piece of card with it. I used Clear UTEE over the top of this, heated it up and it gives a nice enamelled look. I waited until it had cooled and repeated the process, in the end the card had three coats of UTEE... the pics don't really pick up the crackles too well but they do look really pretty... like cracked ice.


Well, that's about it from me. I would just like to take this opportunity to say a big thank you to Jennie for the past four years being on her Creative Team and co-ordinating it. I will be stepping down from the team on December 31st and I am going to miss Jennie and the girls on the team - they are all such a fantastic bunch of artists and it has been an honour to craft alongside them all these years. Thank you to all you lovely folks for all your wonderful comments you have left me here since this blog started... I am sure that Jennie and the team will have some treats for you to see in the coming months... I will shut up now before I need the Kleenex... THANK YOU all for looking... Bye bye ... Hels x

Wednesday 21 December 2011

Must be Santa by Sioux Jenneys

Seasons Greetings everyone and as this is my last post of the year I'd like to wish you all a very Merry Christmas by sharing this card with you  :)


1. Cut a label using an alterations die and stamped the gorgeous Santa from Mini Christmas in Archival black.

2. Hand colour portions with a cut and dry nib...I used Distress Ink aged mahogany for the hat and berries, worn lipstick for the rosy cheeks and peeled paint for the greenery. I added a touch of Distress Stickles in fired brick to the berries too. The edges were aged with a touch of scattered straw and then some brushed corduroy.


3. I cut a mask from paper using another alterations die and taped extra paper round the edges so that it would cover the whole card front then stamped the snowflake (it's a freebie from The Artistic Stamper with any order this month don't forget) in Versamark and clear heat embossed.

Inked the background with a combo of Distress Ink scattered straw and brushed corduroy again.

4. Then I placed the other part of the mask over the centre panel and inked the rest of the card in Distress Aged Mahogany with a touch of brushed corduroy at the edges.....then stamped the calligraphic mat 13 in Archival coffee.

5. Stamped the lovely Seasons Greetings from Mini Christmas in Archival black and attached the label centrally to finish.


I wish you all the best Christmas ever! :)

See you again in the New Year!
xoxo Sioux

Sunday 18 December 2011

Merry Christmas by Emma

Hi everyone!

Can you believe that it's only a week to go until Christmas?? Where did this year go and where has this month gone? It's already time for me to show you my second project of the month using one of the fab FREE stamps that you get if you place an order at The Artistic Stamper during December.

So, here's what I created ~ a Shadow Box Christmas card featuring another of the adorable images of Mabel Lucie Atwell ~ I hope you like it.
...and here's how I made it ~ I've included lots of close up photos to show you all the detail!

To begin with I stamped the Mabel Lucie Attwell ~ Ah! There You Are (large) image onto a small piece of white card, coloured it in and then cut around the outline of the image.
Next, I made my own shadow box from white cardstock and blended Weathered Wood and Antique Linen Distress Ink over the frame of the box to give some colour.

To create the moonlit background of my shadow box card, I used a piece of 10cm square white card and blended some Tumbled Glass DI over it, masking off a small circle where I want the moon to be. i then removed the 'moon mask' and blended some Antique Linen DI over the area where the mask was. Ink up the snowflakes stamp and stamp the flakes over the background. You can just about see the snowflakes in the photo, but they are much clearer in the flesh.
I then cut a piece of acetate, embossed it using the Tim Holtz Snowflake Flurries Texture Fade and placed it over the stamped snowflake background, adhering it in place, inside the frame. 
Next, using Tim Holtz's Decorative Strip die, I die cut the Festive Greenery from various colours of Ranger Distress Core'dinations paper stack, sandpapered each piece and then arranged and stuck them to the base of my shadow card, together with the stamped and coloured Mabel Lucie Attwell image, which now stands in the foreground of the card, to give a three dimensional look.

I then die cut some snowflakes from white textured card, using the Movers and Shapers Mini Snowflakes die, arranged these around the edge of the frame and stuck them into place. I next used some black Archival ink to ink up the "Merry Christmas" wording from the Tim Holtz Winter Sketchbook stamp set and stamped this onto cream card, mounted it on a piece of Core'dinations from the paper stack and then stuck it to the top of my shadow box card. As the final touch, I squidged some Rock Candy Distress Stickles over all the Festive Greenery die cut pieces.
So, that's about it for this creation and I won't be posting again this side of Christmas...so, I'd just like to wish everyone a wonderful Christmas and thank you for all your comments since I joined The Artistic Stamper Creative Team. It's been lovely reading each and every one of them and I really do appreciate them all.

Bye for now and happy creating. 
Emma x

Friday 16 December 2011

Winter Peace by Alison

Hello Stampers. I have a Wintry double journal page to share with you today. I've used the lovely snowflake stamp that's one of the free stamps you can get with every order this month. You can see them both HERE.

Ok, so I started off by sponging Claudine Hellmuth Black Gesso all over my pages. It's a wonderful dense black, that gives great coverage! I made it thicker in a couple of corners, & stamped into it with the snowflake stamp. Remember to spritz your stamp with water when doing this, & then clean it thoroughly straight after.

Once the gesso was dry, I dry-brushed it with Claudine's Studio Paints in Sky Blue, Smidge of Blue & Purple Palette, finally adding a few highlights with some Blank Canvas. It really highlights the texture on the pages, especially where I stamped into the Gesso.

I stamped the Bare Tree on the right-hand page, then some more Snowflakes onto both pages, using Black Stazon ink. I added some highlights to the tree with an Inkessentials white pen. I used Pearl Perfect Pearl mist to add splatters across my pages. I did this, by shaking the bottle thoroughly, then unscrewing the top, & flicking the tube that goes into the bottle of mist. Hope this makes sense! Lol!

I painted some Grunge letters with Silver Paint Dabber, & glued them to my pages. Then I used small alphabet stamps from the Scrabble & Tags Plate, to stamp words on the edge of some old music sheet. I used Studio Matt Medium to glue these to my pages, together with a couple of scraps of music sheet.

Finally, I used a black pencil to edge the words, & the music sheet scraps.

Thanks for looking!
Alison xxx

Thursday 15 December 2011

TWINKLE TWINKLE BIG GOLD STAR

Hi all, Kat here,
on this chilly December morning,
I thought I would shear with you a Christmas decoration
I made to hang in my window this year,

Don't forget if you make a purchase in the shop
this month you will be sent out a free stamp
click HERE for the details.

I started with a gold star I got from a pound shop
& decorated it with the following :-
the Santa off mini Christmas plate
stamped with black archival ink
cut out & glittered round the edge,
& stuck with foam pads onto a gold nest ability shape,
I then cut 2 lengths of patterned paper from the
Rosette Decorative strip die & stuck them together
to make a bigger rosette, edged with a Gold acrylic paint dabber
I then stuck some foliage bits cut from
brown glittery & antique gold paper using
between the layers,
then I added some gold bells on ribbon (to hang down)
& a bell/bow embellishment to finish.

Here are some close ups.


Hope you like it!

well this is my last piece, this side of Christmas,
so I would like to take this opportunity to say
a big thank you to all you lovely people that
leave me such wonderful comments each time
I post something, they are so appreciated.
& to wish you all an amazing Christmas, 
& a very creative new year.

Also a big thank you to Jennie,
for having me on her design team.

Big Hugs, Kat x.

Wednesday 14 December 2011

Guest Artist for December part 2!

Well hey there,
I am excited to be back with my second offering for my guest artist spot for December.!!
So for my second offering I have used some fab journalling stamps and fab flowers stamps from the Artistic Stamper, distress inks , some wendy vecchi arts parts and a collage frame, as well as some funky ideaology bits , from Tim and some perfect pearls mist.
So here it is:
I started with a collage frame, which I painted up using household emulsion and crackled, a fab effect, this was then coloured using distress inks.
To create the collage inside I drew the shape onto paper and divided to get range of shapes and sizes of squares and rectangles, which were then cut from grungepaper.
Each piece was then coloured using distress inks in various blue shades.
I then started with one piece at a time and added perfect pearls mist to some pieces and crackle paint to one, trying to compliment and contrast adjacent pieces.
I added journalling stamps, journalling words #1, from the artistic stamper to some pieces as a focal point.
I also used the fab swirls,splats and dots stamps, again from the artistic stamper to some of the elements and the dots background to other pieces.
Once the backgrounds were complete it was time to play!
The beautiful flower stamps ,flower power and flower blooms, from the artistic stamper were used to create the fab 3-d flowers out of grungepaper, which were coloured using distress inks and spritzed with perfect pearls mist in pearl.
The leaves were also made using grungepaper, coloured using distress ink in
peeled paint and then covered with dots background stamp.
The small flowers were made in the same way, all from artistic stamper flowers from flower power and flower blooms.
The flowers on the corner of the frame were stamped using the flowers stamp,cut from clearly for art film, a fab mouldable film that can be coloured, heated and then shaped.I coloured these flowers using alcohol inks.
I added some great wendy vecchi arts parts which were coloured and I added
rock candy to the leaves part.
To finish I added some ideaology washers, foliage and fasteners.The washers and fasteners make flower centres.

This has been great fun to make and I love the way the collage effect can be built up using any colours and stamps to suit any taste,
thanks again!!
see you later in the month for my last offering
have a fab inky day
hugs trace x

Tuesday 13 December 2011

Festive Feeling... Giveaway Time!

Goodly Morning Stampfans! Tis that time of the month again when I do my taggy giveaway... this month the tag has been inspired by lots of different techniques shown by Tim Holtz during his 12 Tags of Christmas bonanza this year. Did you know that Jennie is feeling in a very generous festive mood and not only is she giving away two free limited edition stamps with every single order... she has also set up a special discount of a mahoosive 20% on any orders for the stash used in the 12 Tags... to see all the deets, please CLICK HERE. The offer is only open for a limited time... til 18th December so time to grab yourself a nice Christmas pressie bargain! On with this months tag for giving away. To be in with a chance of winning it is a doddle... simply leave me a comment here and tell my what your favourite Tim tag was this year... the winner will be chosen at random and announced here on the blog on January 3rd 2012. I had lots of fun making this tag because I included all my favourite stashly supplies. The base of the tag was coloured with Antique Linen Distress Stain. I spritzed it with water and then dipped the tag into a smoosh of stain (liking that description!) on the craft sheet... using Frayed Burlap (this has to be one of my faves for vintage, nostalgic Christmas projects)


Anyways... I dried the tag with a heat tool and then did some "Ghost Stamping" with the crackle background from the Joyful Song stamp set. This is a really fab technique and so easy... simply pop your stamp onto your craft sheet face up, ink with your Distress Ink and then pick it up in your hands and kind of roll it over your tag... this will mean that there's no start or finish to the image, instead it just fades out... no harsh edges! I dried this with a heat tool and then roughed up the edges with a Paper Distresser and blended Vintage Photo Distress Ink around the edges. I used a variety of green Alcohol Inks to colourize a piece of Kraft Glassine paper, scrumpled it, dragged Vintage Photo DI over the top of the scrumples and then dried it. I used the Holly Branch Alterations Die to cut five leaves out and then used the Tattered Pinecone Die to cut out three shapes from brown cardstock... I then assembled them into the pinecones and added Picket Fence Stickles to the edges of the bracks. The little holly berries are Baubles, coloured in a zippy bag with Red Pepper Alcohol Ink and tied with wire and some vintage lace - these are FAB ideas from Tim... and all the deets for the 12 Tags are on his blog. I used a piece of Lost & Found music paper to cut a Tattered Banner and popped this into the pinecone/holly leaf assembly and then set about making the sentiment... which is another easy but cute way of stamping; using Distress Embossing Ink for stamping the sentiment onto Kraft card and then embossing with Ranger Black Embossing Powder and cutting around the sentiment and edging with Vintage Photo DI.


Cor... this is a long winded explanation for one tag... nearly done! The Idea-ology Christmas Adornment charm was painted with a selection of Adirondack Dabbers... using a teensy Claudine Hellmuth Studio brush to apply the paints... then drying with a heat gun, sanding gently and then squishing it into the Distress Embossing Ink and embossing with Clear Embossing Powder... worn of warning... don't try to pick it up straight after you have heated the powders... it is metal... and that means it is hot... ouch!!! Just sayin ;o)) I repeated the "enamelling" process so the bells are really covered with a good thick layer of powders... punched a hole in the top using the Idea-ology Screw Punch and popping onto a little Jump Ring and Mini Safety Pin. Once the whole tag was assembled, I gave it is a really fine spritz with Heirloom Gold Perfect Pearls Mists.


You will see that there's a border of snowflakes and the odd snowflake dotted around the tag... I made these using more Alterations dies to cut Kraft Glassine that I had coloured with SnowCap Alcohol Ink... I have done a quick Tutorial over on my own blog so you can see how I did this... all the deets are HERE. Well, that's all from me for now... thanks for looking!!! TTFN

Hels x

Sunday 11 December 2011

Balancing Act by Sioux Jenneys

I thought I'd take a break from the Christmas stuff and share a journal page today that uses one of the new background stamps.....although I have used the free icicle stamp as an added touch...it makes a great border for a page :)


1. Ink the large solid dancer in Archival black and kiss stamp using the numbers on the reflections set by Tim Holtz.  Draw a thick black line at an angle for the tightrope...
...cut a mask and apply to the image. Stamp the separate plain bodice onto card in Distress aged mahogany....cut out and apply glossy accents.

2. Stamp the watch background on most of the page in Archival black...
...stamp again onto some white card stock and cut some label shapes from this using the tiny tags and tabs die set and colour with Distress vintage photo.

3. Spritz some hand made Distress re-inker mixes (made using one full pipette of re-inker and topping up with water in a Ranger mini mister spray)...
...I used antique linen, peeled paint and faded jeans.

4. To tone down areas on the background apply some Distress stain picket fence.


5. Stamp the icicle stamp in Distress peeled paint and apply Distress stickles.

Don't forget that you can choose either this icicle or a snowflake stamp totally FREE with any order placed at The Artistic Stamper this month ;)

6. Stamp the word LIFE from journaling words in Archival aquamarine onto sticky backed canvas and apply to a black mat card.


7. Stamp the scrabble tiles in Archival crimson, cut out and apply to the tags....stamp the umbrella from T!m's umbrella man in Distress aged mahogany and cut out...

...Cotton thread was tied to the tags and a little dries clear glue was applied to stop them unravelling.


There is still plenty of room for some hand written words in the future too.

Hope your Christmas preparations are going smoothly :)

See you again just before the big day to share my final piece of the month.
Thanks for looking :)
xoxo Sioux